Roof Restoration: How Long Does a Roof Resto Take to Complete?

If you live in Frankston, the Mornington Peninsula, or anywhere along the Bayside, you know that our homes take a beating. Between the salt air from the bay, the harsh Australian sun, and the unpredictable Melbourne storms, your roof is the first line of defence protecting your biggest asset. At Frankston Peninsula Roofing, one of the most common questions we hear from homeowners is: "Mike, how long is this actually going to take?"
It's a fair question. You have a busy life. You don't want tradespeople stomping around your property for weeks on end, and you certainly don't want your home exposed to the elements for longer than necessary.
We always give the honest answer: there is no single "magic number" that applies to every roof. While there are ballpark estimates — and we use these to keep our roofing team on track — the truth is that guaranteeing a specific finish time down to the hour is impossible for any honest tradesperson. A roof restoration is a major construction project influenced by a wide range of variables.
However, typically speaking, a standard restoration by our team takes between 3 to 5 days, weather permitting.
In this comprehensive guide, we pull back the curtain on the industry. We look at exactly what happens during those 3 to 5 days, why some roofs in Mount Eliza take longer than roofs in Seaford, and why rushing a job is the worst mistake a homeowner can make.
Why Your Roof Is Unique (And Why That Matters)
Your roof is not exactly the same as the one your neighbour has. Even if you live in a housing estate in Narre Warren where the builds look similar, the wear and tear on your specific roof is unique. It has its own needs, its own history of repairs, and its own micro-climate exposure.
- The Orientation: A north-facing roof section in Frankston South will have significantly more UV damage and oxidisation than a south-facing section.
- The Surroundings: If you have large gum trees overhanging your property in Mornington, your roof will have more moss, lichen, and debris buildup than a coastal home in Seaford that is exposed to high winds but fewer trees.
- The Pitch: Steeper roofs require more safety gear, slower movement, and more intricate work than low-pitch roofs.
The bigger the roof, the longer it will take to restore. But beyond size, there are all kinds of variables that affect how our roofing specialists carry out their work.
⚠️ Safety Warning: If a door-knocker tells you they can finish a roof restoration in one day for a cash price, run the other way. That is a recipe for peeling paint and leaking ceilings within six months.
What Is Included in a Full Roof Restoration?
To understand the timeline, you need to understand the work involved. Many people mistake "Roof Restoration" for "Roof Painting." Painting is just the final aesthetic step — restoration is about structural integrity.
1. Inspection and Safety Setup
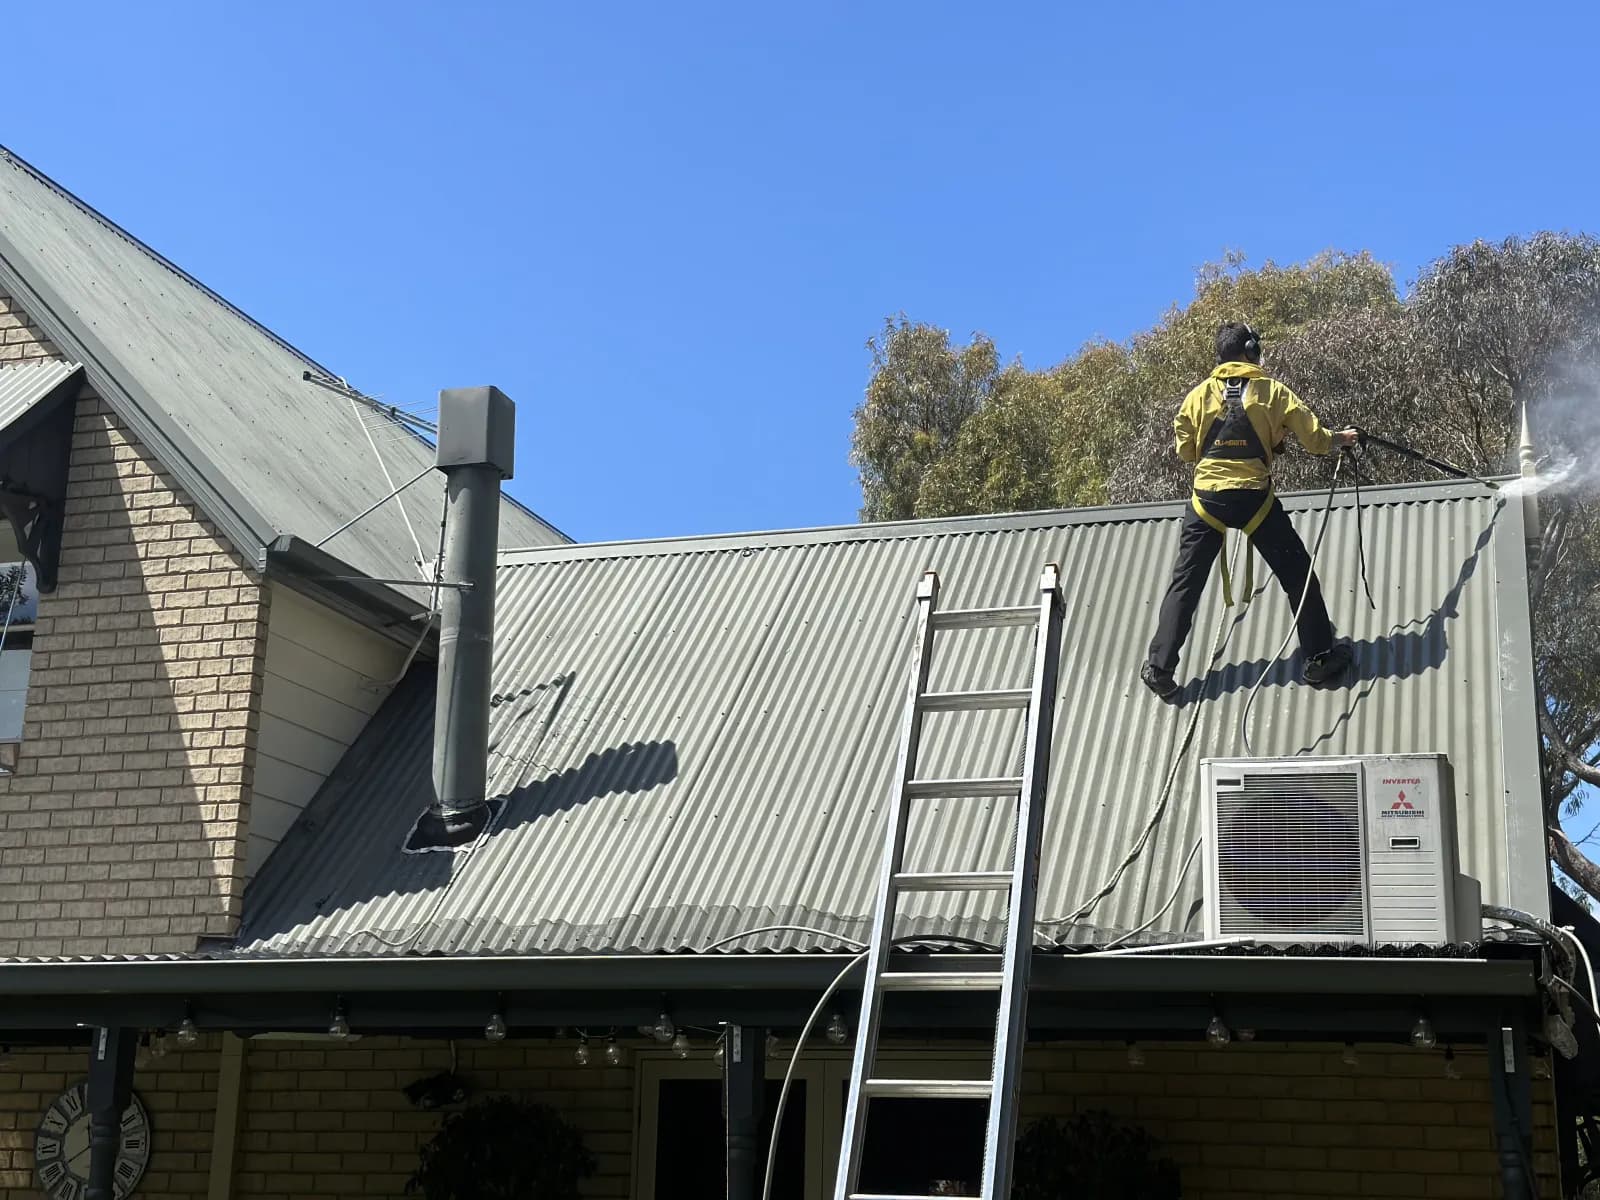
Before a single tile is cleaned, we assess the site. In areas like Mount Eliza or Mornington where properties are often double-storey or built on sloping blocks, safety rail installation is mandatory. This protects our crew and ensures we are fully compliant with WorkSafe Victoria regulations. We are fully licensed and insured — we don't cut corners on safety.
2. High-Pressure Cleaning
This isn't just a garden hose rinse. We use industrial-grade pressure washers operating at 3000+ PSI to strip away years of oxidisation, moss, lichen, salt buildup (common in Bayside suburbs like Chelsea and Seaford), and general grime. If this step is rushed, the new paint won't stick. It's that simple.
3. Re-Bedding and Pointing
This is the most critical structural step. Bedding is the cement mortar that holds your ridge caps in place — over time, it cracks and crumbles. We remove the degraded bedding and lay a fresh cement base. Pointing is the flexible compound that seals over the bedding. We use a flexible pointing compound that expands and contracts with Melbourne's temperature swings, ensuring a watertight seal that rigid cement can't provide.
4. Tile Replacement
We inspect every inch of the roof. Any cracked, chipped, or broken tiles are removed and replaced. We source matching tiles — even for discontinued profiles — to ensure a seamless look. We also check the small cut tiles near valleys, which original builders often don't secure properly.
5. Sterilisation (Anti-Fungal Treatment)
Especially in leafy suburbs like Frankston South and Mount Eliza, fungal spores live deep in the pores of the tiles. We apply a sterilising treatment to kill these spores so moss doesn't grow back underneath your new paint.
6. Primer and Sealer
We apply a robust primer/sealer that soaks into the porous concrete tiles, creating a solid surface for the topcoat to adhere to. Without this, the roof acts like a sponge, sucking the moisture out of the paint and causing it to flake.
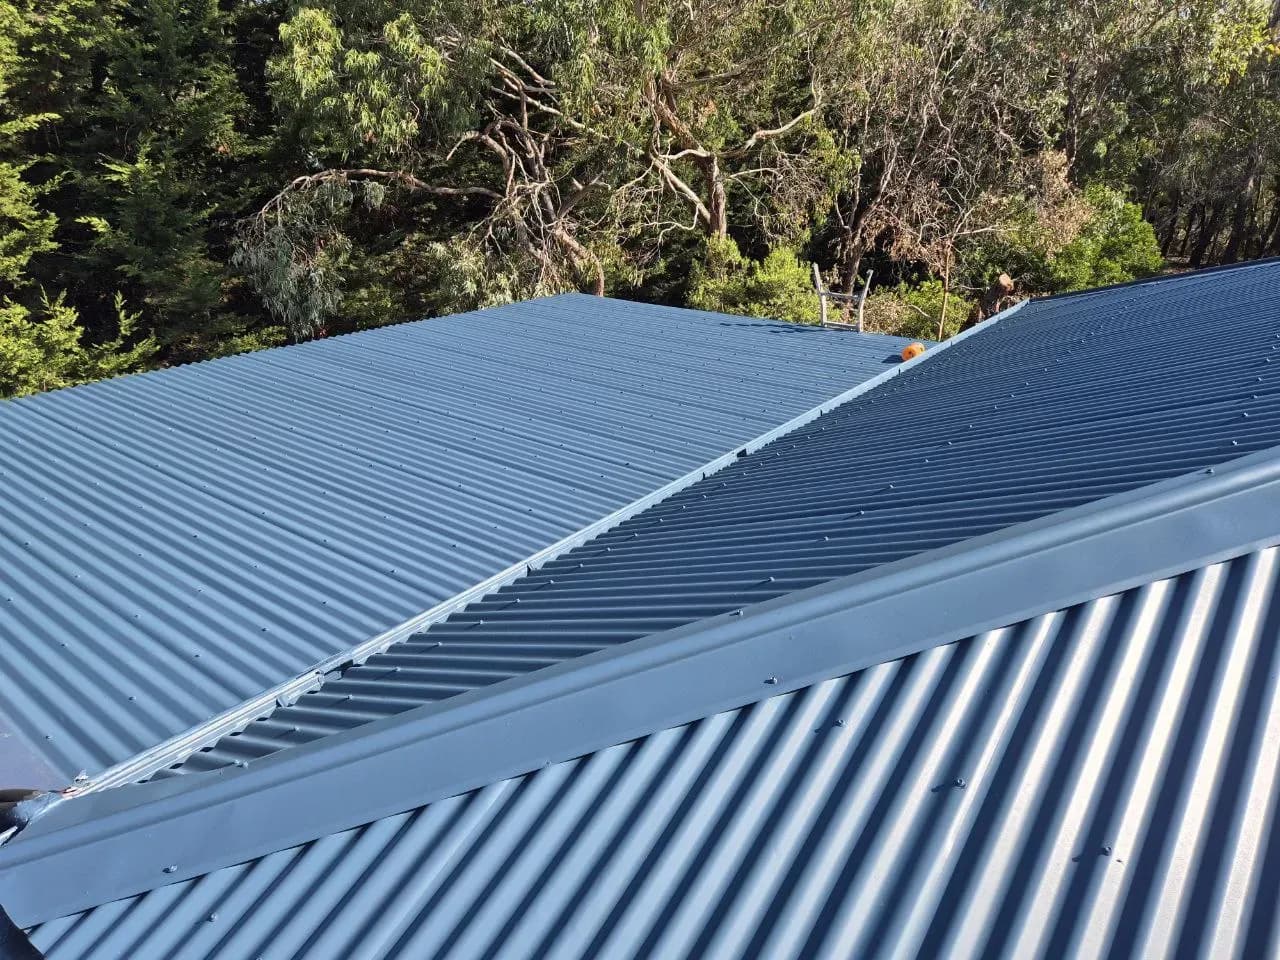
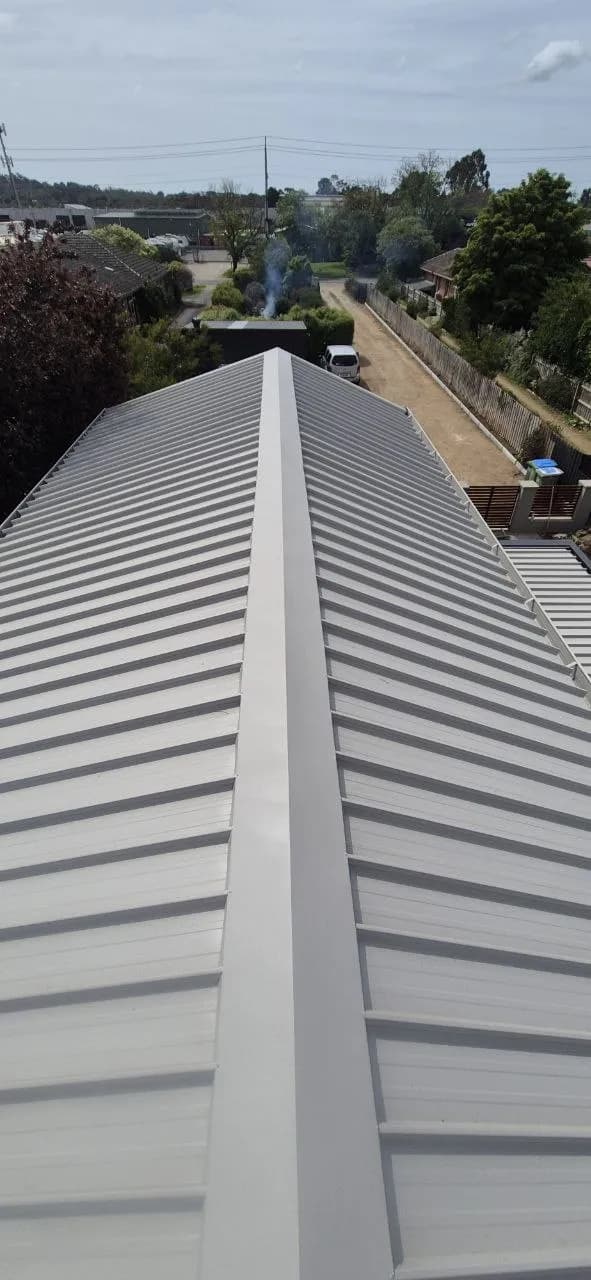
7. Top Coats (Roof Painting)
Finally, we apply two coats of premium roof membrane — a thick, specialised exterior coating designed to withstand Australian UV levels and thermal shock. This gives you that "brand new roof" look and adds a protective barrier against the elements for years to come.
The Day-by-Day Timeline
While every job is different, here is what a typical roof restoration project looks like with our team.
Day 1: Preparation and Cleaning
- Arrival and site setup — installation of safety rails and guardrails
- Replacement of broken tiles begins before cleaning to prevent water from blasting into your ceiling cavity through cracks
- Heavy cleaning with industrial-grade pressure washers — we wash the roof from top to bottom and disconnect downpipes from rainwater tanks to prevent sludge entering your water supply
- Full clean-up of walls, driveway, and paths to remove the muck that came off the roof
Day 2: Structural Repairs (Bedding and Pointing)
- Removal of old ridge caps and crumbling mortar — careful hand-work to avoid damaging surrounding tiles
- Fresh cement bedding laid along every ridge line and hip, with each cap levelled and aligned
- Flexible pointing compound applied over the bedding — colour-matched to your roof for a seamless finish
- Final check of all valley irons, flashings, and penetration points — any repairs completed
Day 3: Sterilisation, Priming, and First Coat
- Anti-fungal steriliser applied to the entire roof surface, with time allowed for penetration before priming
- Primer/sealer applied by airless spray or roller — this coat soaks into the tiles and creates the bonding surface
- Once the primer has flashed off (surface dried), the first topcoat of premium membrane paint is applied
- Quality check — any missed areas, drips, or thin spots addressed before leaving the site
Day 4–5: Final Coat and Completion
- Final topcoat applied — two full coats ensure maximum durability and colour richness
- Touch-ups and detail work around ridge caps, valleys, and edges
- Safety equipment removed and full site clean-up — we leave your property cleaner than we found it
- Walk-through with the homeowner, handing over warranty documentation and maintenance guide
What Can Extend the Timeline?
Several factors can push a restoration beyond the typical 3–5 day window. Understanding these helps set realistic expectations.
- Weather: Melbourne's unpredictable rain is the single biggest variable. Coatings need at least 4 hours of dry conditions to cure properly. We will never apply paint if rain is imminent — it wastes your money and our product.
- Extensive damage: If we discover significant structural issues during the initial inspection — rotted battens, perished sarking, or severe tile degradation — additional repair work is needed before the restoration can proceed.
- Roof complexity: A simple hip roof with four clean faces is faster to restore than a complex roof with multiple levels, dormers, skylights, and valleys. Each additional feature requires careful flashing work.
- Access difficulty: Properties on steep blocks in suburbs like Mount Eliza or double-storey homes may require additional scaffolding and safety setup time.
- Asbestos: If we identify potential asbestos materials during inspection, work must stop until testing is completed. Asbestos removal requires specialist licensed contractors and adds significant time and cost.
Why Rushing a Restoration Costs You More
We understand the temptation to get it done fast. But in roofing, speed kills quality. Here's why each step needs its time.
- Skipping drying time: Applying topcoat before the primer has properly cured causes delamination. The entire coating system can peel off within 12 months, requiring a complete re-do at your expense.
- Rushing bedding: Cement bedding needs time to set before pointing can be applied. If pointing goes on too early, the movement of semi-cured bedding cracks the pointing seal, allowing water in.
- Inadequate cleaning: A quick wash leaves oxidisation and moss roots embedded in the tile. Paint adheres to the dirt instead of the tile, and flaking begins within the first winter.
💡 Pro Tip: A properly executed 5-day restoration with premium materials will last 15+ years. A rushed 2-day job will need redoing in 2–3 years. The math is simple — do it right once.
How Frankston Peninsula Roofing Keeps Your Project on Track
At Frankston Peninsula Roofing, Mike Umarov personally manages every restoration project. Here's how we minimise delays and maximise quality.
- Detailed pre-start inspection: Before quoting, we identify every issue. No surprises mid-job that blow out the timeline.
- Weather monitoring: We check the Bureau of Meteorology 7-day forecast before scheduling coating days. If rain is coming, we adjust the schedule proactively.
- Materials pre-ordered: All tiles, coatings, bedding, and pointing compounds are ordered before Day 1. No waiting around for deliveries.
- Owner-operated: Mike is on site for critical stages — not a subcontractor who's rushing to get to the next job. The person who promises quality is the person who delivers it.
Ready to Restore Your Roof?
Whether you're in Frankston, Hampton Park, Cranbourne, Berwick, or anywhere across the Mornington Peninsula, a professional roof restoration is one of the smartest investments you can make in your home. It protects the structure, boosts kerb appeal, and can add significant value to your property.
With our 10-year workmanship warranty, premium Australian-made materials, and owner-operated commitment to quality, you can trust that the job will be done right — even if it takes an extra day to ensure perfection.
Call Mike today on 0437 641 027 for a free, no-obligation roof assessment. We'll inspect your roof, give you an honest timeline, and provide a fixed-price quote with no hidden costs. Serving Frankston, the Mornington Peninsula, and the City of Casey.
Related Services
Serving Frankston, Mornington Peninsula & South-East Melbourne
We provide expert roofing services across these suburbs and surrounding areas. Click your suburb for local information and a free quote.
Frequently Asked Questions
How long does a standard roof restoration take?
A standard roof restoration by Frankston Peninsula Roofing typically takes 3 to 5 days, weather permitting. This includes pressure cleaning, re-bedding and pointing, tile replacement, sterilisation, primer/sealer, and two topcoats. Larger or more damaged roofs may take up to 7 days.
Can a roof restoration be done in one day?
No reputable roofer can complete a genuine restoration in a single day. A one-day "restoration" almost certainly skips critical structural steps like proper bedding, pointing, and adequate drying time between coats. If someone offers a one-day finish for a cash price, that is a red flag — the paint will peel within months.
What happens if it rains during my roof restoration?
Rain is the biggest variable. High-pressure cleaning can proceed in light rain, but coatings must be applied on dry days with at least 4 hours of drying time before any moisture. If rain is forecast, we reschedule coating days rather than risk adhesion failure. We monitor the Bureau of Meteorology closely and communicate any delays immediately.
Does the size of my roof affect how long it takes?
Yes. A small single-storey home in Seaford with a simple hip roof might be completed in 3 days. A large double-storey property in Mount Eliza with a complex roof, multiple valleys, and extensive ridge capping could take 5–7 days. Roof pitch, access difficulty, and the extent of existing damage also affect timelines.
How long should I wait before walking on a restored roof?
We recommend waiting at least 7 days after the final topcoat before any foot traffic on the roof. The coating needs time to fully cure. After that, occasional maintenance access is fine, but regular foot traffic should be avoided to preserve the coating's lifespan.
Need Help With Your Roof?
Get a free, no-obligation inspection and quote. We'll give you honest advice — even if that means telling you it just needs minor repairs.